With the release of the Heretic II Enhancement Pack, players may now add new skins to the game. Creating new skins for Corvus or Kiera is not especially complex if you have the right tools and follow the steps outlined in this tutorial. The most difficult step is actually painting the skins to fit the models and look the way you want them to. For this you will need a good paint program which can at a minimum open .tga files, allow you to alter them with paint tools, and save the results as .pcx files. I use Adobe Photoshop, and find its powerful cut, paste and color manipulation tools especially useful.
1. Preparing for the Skins
We will do most of our work in the Heretic II\base\textures directory. This is the best place to put our files and tools, since the program for converting our skins to the .m8 format used by Heretic II places them here by default. After you become an expert at skinning, you may develop other preferences. But for now, the following files should be placed in our working folder:
| qdata.exeThis tool is the one you will use to convert your skin to the Heretic II format. Copy this from the Heretic II\toolkit\designer directory. You did install the Heretic II toolkit from your CD, didn’t you? |
| m82tga.exe |
| skin1.qdtThis is a simple text file you can create with notepad or your favorite ascii text file editor. The following line is all that is needed:$load base\textures\skin.pcx $mip skin 0 0 256 256 |
| skin1.batAnother text file you can create, with the line shown below. Diehard DOS prompt users may opt to simply type this command in a DOS window (make sure you’re in our working directory):qdata skin1.qdt |
2. The Skin Template
Before you make your skin, you will need a template to start from. Choose a skin or two that you like and copy the .m8 files from the Heretic II\base\players directory to our working directory.
Note that each skin has a basic version with a name like “Skin.m8”, as well as a damaged version, “SkinDmg.m8” and a menu picture, “Skin_i.m8”. Some also have plague versions. It is generally best to start with the basic version. A useful “blank” skin is Reflect.m8; if you’re an advanced paint program user, you can alter the color balance to change the golden hue to a flesh tone, and then paint your new design elements over that.
For first-time skinners, it is easier to just start with Corvus.m8 or Kiera.m8 and make a few small changes before going completely wild.
Once you have the .m8 file(s) in our working directory, just execute m82tga.exe. It creates .tga files out of ALL .m8 files in the same directory, so when you run it during a later skinning session, make sure there are no .tga files of the same name in there that you want to keep, since it will overwrite them.
3. Designing the Skins
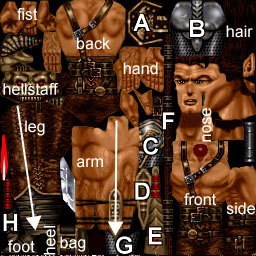
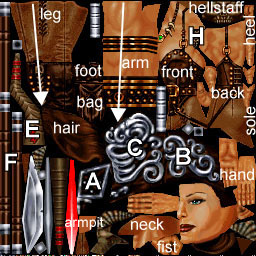
Open the new .tga skin template in your paint program. You will notice that the skin is chopped up into patches and arranged rather tightly into a 256×256-pixel square. These “patches” are used in Heretic II by wrapping them around the player model. Many patches (like the arm or leg) are “mirrored” and used for both halves or parts of the model that are symmetrical. Most patches are easily identifiable body parts, but some are more obscure. Below is an list of some that need explanation. Refer to the skins of Corvus and Kiera below.
|
Corvus (basic skin)
|
Kiera (basic skin)
|
 |
 |
A. Armor piece over shoulder. The basic skin shows the Silver Armor, while the damaged skin shows the Gold Armor.B. Back of armor over torso. For Corvus, this is one patch that is not mirrored, like the front and back of his unarmored torso..
C. Front of armor over torso. Note that Kiera’s torso armor is one large wrap-around patch that is mirrored.
D. Corvus’s right arm-guard. This patch is added to the mirrored left arm. Kiera does not have this.
E. The Storm Bow. The damaged skin shows the Phoenix Bow. These, and the Hellstaff, should not be altered, so that they match the models of the weapons awaiting pickup on the map levels.
F. The Bladestaff. The damaged skin shows the version of the powered Bladestaff (such as after a visit to a blade shrine).
G. Side of Corvus’ torso armor. The damaged skin shows the Gold Armor.
H. Top of the foot.
Note the white arrows drawn on the arms and legs are reference lines indicating the front edge of the leg and the outer edge of the arm. Also note that Kiera’s skin has a few more patches that are harder to identify, such as the underside of the back of her hair (located under the face patch) the crotch (located at the bottom, under the armpit patch) and inner thigh (located near the upper right, above the shoulder, next to the hellstaff).
4. Processing the Skin
Once your skin is designed, you must save it as a 256-color .pcx file. Choose a color palette that uses similar colors to the exsisting skins. If you use unusual colors, it may not appear correctly in software rendering mode (you can see this with my “Violet” skin). Save the basic skin in our working folder as “Skin.pcx”. It is best to leave the damaged skin for later, until you are sure the basic skin is perfect. Then you may add the damage to the basic skin, and save it as “SkinDmg.pcx”.
Now run skin1.bat to create the Skin.m8 file. Copy it into the appropriate players directory (male or female). Until you have your SkinDmg.m8 and Skin_i.m8 files, you will have to create bogus copies. To do this, you can copy your Skin.m8 to SkinDmg.m8, and copy Corvus_i.m8 or Kiera_i.m8 to Skin_i.m8. Now you can fire up Heretic II and choose your new skin in Multiplayer setup. Start a new server and load a deathmatch map. You can now see your new skin in all its glory to check and see if it looks right. You may also use qMView from the toolkit to view your skin, or the new modified version by Gwynhala, which restores the “missing triangles” in the skin overlay when “Toggle Skin Overlay” is clicked. Another useful tool is MipMaker for converting bitmap(*.bmp) style images to the skin(*.m8) file format.
To create the menu picture for the skin, you should make a screenshot of your new skin in action while in Heretic II or qMView. To make a screenshot in Heretic II, bind a key to “screenshot”. At the console or in your config file, you can type: bind F8 “screenshot”. Then crop the screenshot of your skin to 128×256 and save it as a 256 color .pcx file named Skin_i.pcx.
When you have a Skin.pcx, SkinDmg.pcx and Skin_i.pcx, you are ready to process your final .m8 files. I use a second .qdt and batch file:
skinall.qdt:$load base\textures\skin.pcx $mip skin 0 0 256 256
$load base\textures\skindmg.pcx $mip skindmg 0 0 256 256
$load base\textures\skin_i.pcx $mip skin_i 0 0 128 256 |
| skinall.bat:qdata skinall.qdt |
Notice that the last line in skinall.qdt refers to the skin_i.pcx file and has dimensions of 128×256 rather than 256×256.
5. Refining the Skin
Many times getting the patch designs to align properly can be frustrating. Take the time to make any neccesssary adjustments to the skin, re-processing it and loading it into Heretic II. Use the games’ camera and lighting to test how the skin looks in different light levels and colors. View it from all angles, using Camera Lock and Unlock (F10 and F9). There is nothing worse than releasing your skin to the world only to later discover that there are purple soles to your green boots.
6. Final Steps
The final step is to rename your skin files to something appropriate. For example, after designing the Egyptian skin, I named them Egyptian.m8, EgyptianDmg.m8 and Egyptian_i.m8. Copy these files into the Heretic II\base\players\male or female directory and you’re all set!
Your skins will only be visible to other players if they have copies in their players directory as well. If you are playing on a server with new skins, they will be downloaded automatically so you will be able to see the other players’ skins.
Wydraz’s Skinning Tutorial is copyright ©1999 Wydraz.
|


